During metallographic sample preparation, the cut samples are usually mounted in a resin into cylindrical shapes before polishing. While mounting may seem as an auxiliary step in sample preparation, it has profound implications on the polishing process, hence determining the quality of overall sample preparation process. This also implies an importance on the right choice of mounting process and consumable which depends on the nature of material to be inspected and the objective of analysis. While a mounting resin might suitably work for general microstructure purposes, it might not be suitable for the microstructural analysis of a delicate coating on the material.
Objective of mounting
The principal objectives and advantages of mounting are as follows:
- Safety from sharp corners, also enhanced life of polishing pads
- Filling holes, cracks or open-porosity in the sample
- Edge retention (Presented later in the document)
- Specimen identification
- Easier handling and storage
A good mounting process, at the core level, can be optimized depending on the type of material and the objective of metallographic analyses. On a secondary level, an ideal mounting process would consider environmental safety, productivity of the mounting process, and ease to polishing the mounted samples. The following section gives a brief overview of the mounting processes in existence for metallographic sample preparation.
This post discusses the way to choose the right mounting process and consumables for your metallographic analyses.
Mounting Processes
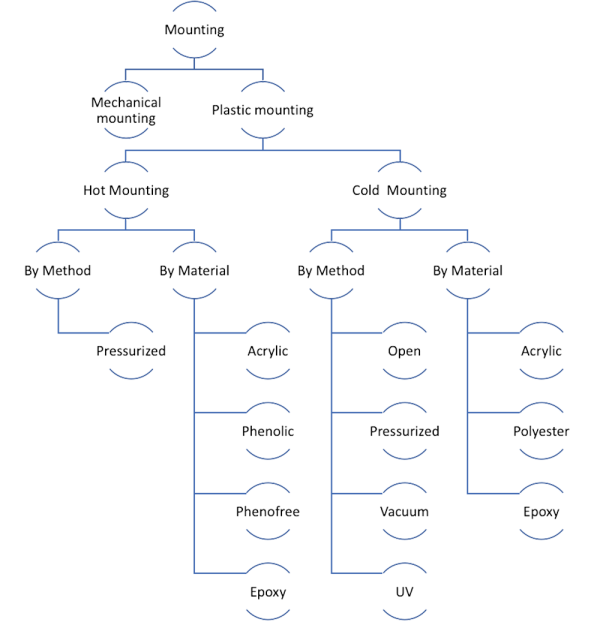
Classification of Mounting Processes
As shown above, the principal type of mounting used today for metallography is resin-based mounting. However, some laboratories use mechanical mounting systems, similar to clamping systems in cutting machines, to increase productivity of sample preparation processes.
Resin-based mounting systems can be classified as:
Hot mounting: Heats resin powders to over 170°C and compacts it using pressure inside a mounting chamber.
Cold mounting: Uses chemical process of polymerization to harden a viscous mix of constituents (generally a resin and a hardener) in a mounting mold.
For any mounting process chosen, one critical characteristic is the size of mount chosen. Most mounts are cylindrical, however rectangular mounts are available for specific applications. As a general rule, the diameter of the mount should not be too big or too small compared to the size of the piece mounted. Otherwise, the difference in hardness between the resin and the piece will affect the polishing quality more significantly. As an approximate rule of thumb, it is ideal to have a minimum of 3 mm from the edge of the piece mounted to the edge of the mount. It is ideal to have the maximum dimension of the surface of the piece not less than 50% of the diameter of the mount.
Criteria for choosing a Mounting Method
Temperature and Pressure
Principally, hot mounting is used for samples that can withstand temperatures over 170°C and loads over 1000 daN, without altering the microstructure. When the sample analyzed is pure aluminum for example, grain coarsening can happen while mounting, affecting the microstructural or hardness analyses carried out after polishing can become inaccurate. Sometimes, alloys such as Inconels that can withstand high temperatures, when they have very thin-walled curves, can deform under the pressure of mounting.
For all samples sensitive to temperatures above 170 °C, cold mounting is preferred.
Mounting intricate shapes or Presence of Open Porosities
When cold mounting is chosen as the desired practice because of temperature and pressure constraints, the method of cold-mounting and the resin chosen should be based on the characteristics of what is to be analyzed in the sample. When there are open porosities in the sample, the resin does not necessarily have the driving force to enter the pores and intricate gaps in the sample. Depending on the type of intricacy, cold mounting can be carried out under pressure or under vacuum.
To mount under pressure, means to use a pump compressed air into a chamber with an equipment such as Lam Plan MM808, hence, pushing the resin into the sample from various directions. This does not necessarily fill all porosities but avoids entrapment of bubbles of air in the resin. For open porosities, a vacuum system such as Lam Plan MM818 is desirable.
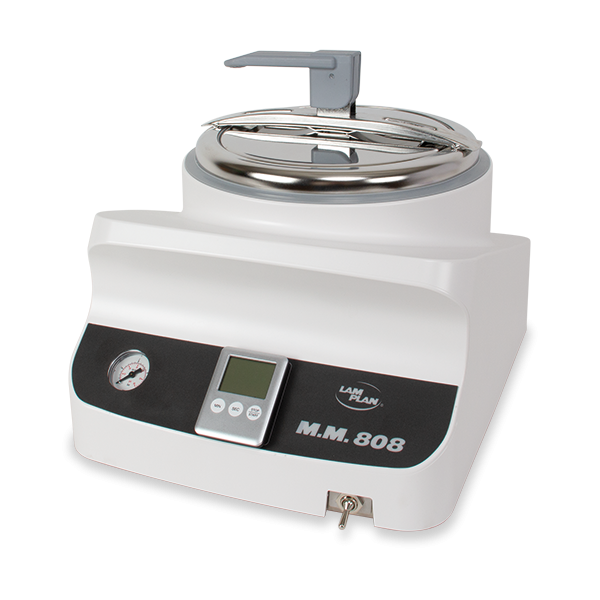
System M.M.808 for mounting under pressure
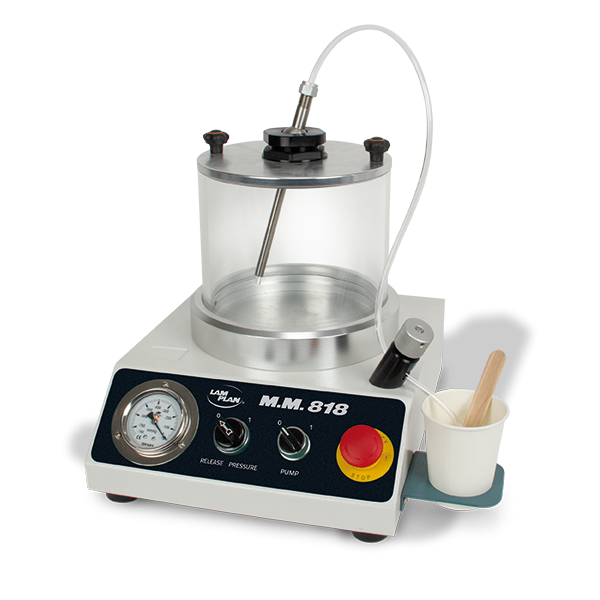
System M.M.818 for mounting under vacuum
Time constraint
One of the biggest advantages of hot-mounting is time-efficiency. Shown below is the duration of isothermal holding time at peak temperature combined with cooling time for making 30 mm mounts in a mounting press.
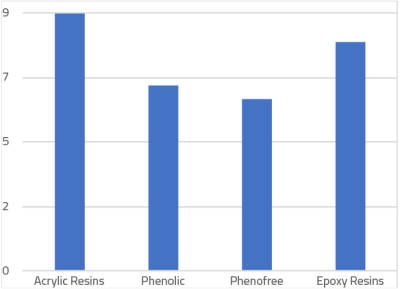
Mounting time (Heating + Cooling cycle) for frequently used Hot Mounting Resins in a 30 mm chamber
Also, the time is influenced little by the type of resin chosen, compared to cold mounting where the mounting time changes significantly based on the type of resin. For example, an acrylic resin can take between 8 to 15 minutes, whereas an epoxy resin takes between 3 to 10 hours to polymerize to maximum hardness. Considering that cold mounting consumables are cheap and easier to replace, samples can be mounted in parallel. Whereas, to hot mount samples in parallel, multiple hot-mounting presses have to be bought.
Shown below are mounting times for cold mounting resins classified by type.
| Resin type | Curing time |
| Acrylic Resins – Lam Plan 605, 609 | 9-15 min |
| UV-cured acrylic resins – Lam Plan 601.2 | 10-30 min |
| Polyester Resins – Lam Plan 607 | 15-20 min |
| Epoxy Fast Curing – Lam Plan 603.2 | 2.5 – 4 hours |
| Epoxy Slow Curing – Lam Plan 603.2 | 6-10 hours |
Criteria for choosing a Mounting Resin
A resin can be chosen based on two criteria dictated by the application and material of interest:
- The significance of resin shrinkage
- The hardness and abrasion resistance of the resin
Shrinkage and Edge retention
Edge retention is among the critical reasons for mounting. Resins shrink dimensionally on polymerization, and this applies to mounting resins as well. This shrinkage introduces a gap between the resin and the sample and this gap can be very detrimental for microstructural analysis. Firstly, the gap directly affects the polishing quality of the sample as abrasives can get stuck with the gap which could get released at a later stage of polishing leading to profound scratches after fine polishing.
When there are delicate coatings to analyze, these gaps can result in their damage while polishing.
Since etchants can penetrate the gaps and ooze out during analyses, etch-homogeneity across the surface is largely reduced by these gaps.
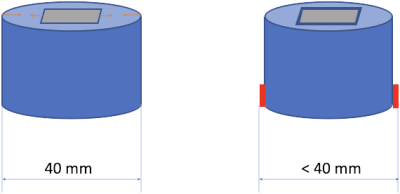
Shrinkage in a resin while hardening creating a gap between the specimen and the resin. While the expected diameter of the sample is 40 mm, the resulting diameter is usually less 40 mm.
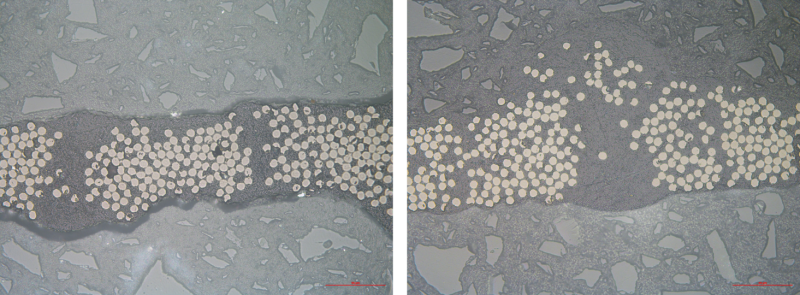
Good and bad edge retention in a fiber reinforced composite. The microstructure on the left shows a huge gap at the boundary of the composite resulting in a bad edge retention after polishing, whereas the image on the right mounted using the right process shows no such gap resulting in a good edge.
Importance of Hardness
Resins recommended for metallographic mounting purposes have a hardness around 80 Shore D. However, some resins are harder and more abrasion-resistant than others, and their hardness relative to the hardness of the sample can affect the performance of polishing steps that follow. For example, when the sample is too hard and the resin is too soft, grinding the samples result in a differential material removal across the sample resulting in poor flatness of the pieces or deep scratches around the edge of a sample. This effect can also arise from bad choice of polishing method which is discussed here.
As an approximate rule of thumb, the abrasion resistance of resins for metallographic applications descends in the following order:
- Epoxy Resins
- Polyester resins
- Phenolic resins
- Acrylic resins
Specialty of an application
There are some applications that demand special characteristics from a mounting resin. For example, two cases are presented below.
Recovery of mounted specimen
The application could dictate the need for recovering a sample after mounting and polishing, typically a case in industries working with precious metals. In this case, the choice of resin gets limited to soluble acrylic resins such as the Resin 605 that can dissolve in acetone.
Mounting for Electron Microscopy
When a material characterization is carried out in electron microscopy, it is critical for the mount to be conductive since non-conductive resin can result in ‘charging’ of electrons on the specimen surface resulting in poor image quality. A phenolic or acrylic mounting resin with copper or graphite fillers are the choices available for such applications.
Contact us
More choices of resin and troubleshooting advice can be found here.
Get in touch with our technical team (essais@lamplan.fr) to discuss possible improvements at your metallographic lab. For material-specific advice, check out our other posts on Box of Knowledge here.